Friday, September 18, 2009

Long time no post

Not being very good about posting my projects, am I?

Alrighty, well here's some sculpey stuff I'm working on at the moment:
September sculpey set

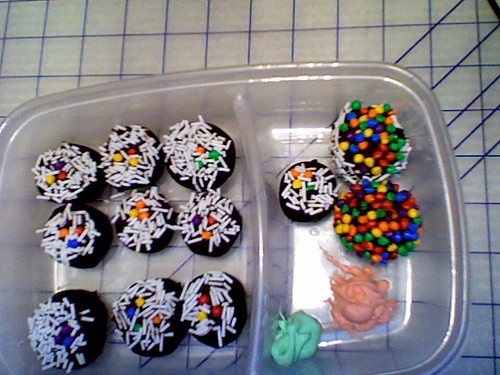
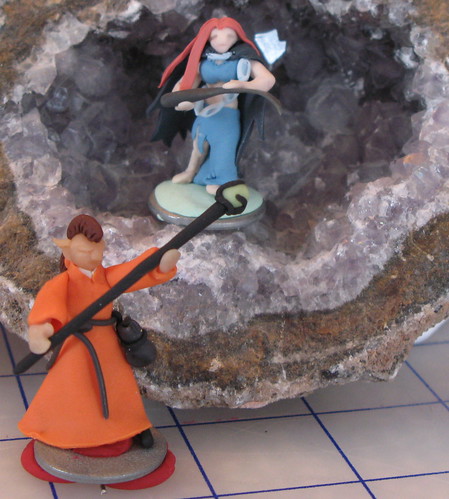
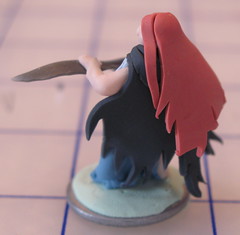
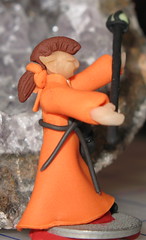
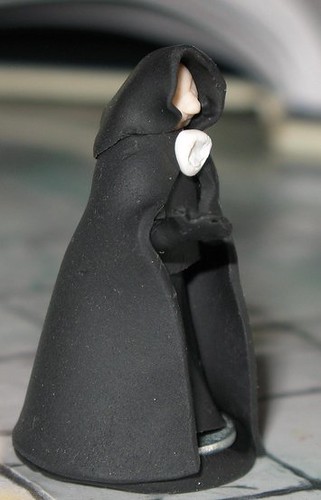
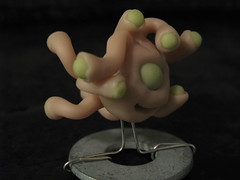
Clockwise from the top left this is Toph from Avatar: The Last Airbender, Castiel from Supernatural, and Dean's pendant that he wears - also from Supernatural. For once I'm not sculpting stuff for D&D! I wanted to try my hand at cell phone charms. I like how Castiel turned out but I'm a bit worried about him breaking - he has a lot of little pieces. I did a better job of simplifying Toph so as to hopefully be fairly durable - but I forgot to set the wire in to attach her with so she's going to just be a pretty little desk ornament. She's cute, but I think I still need to work on the balance between detail and durability... something between these two is probably best.

Dean's Pendant

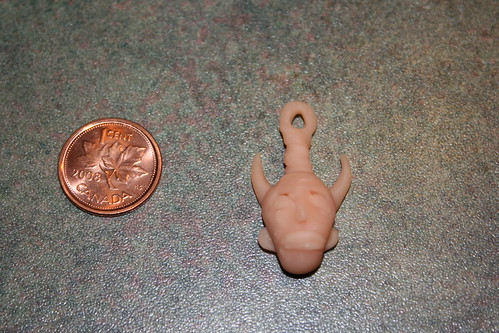
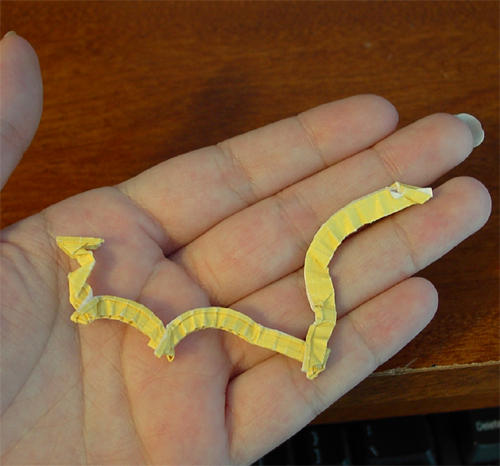
This is WIP of Dean's pendant on Supernatural... which is kind of funny that I'm working on this at the moment because in last night's episode we got some new information about it. I found a picture somewhere of a recreation... so this being a recreation of a recreation I'm not sure how well I've done capturing it. I couldn't find a good screen cap from the show to base it off of.

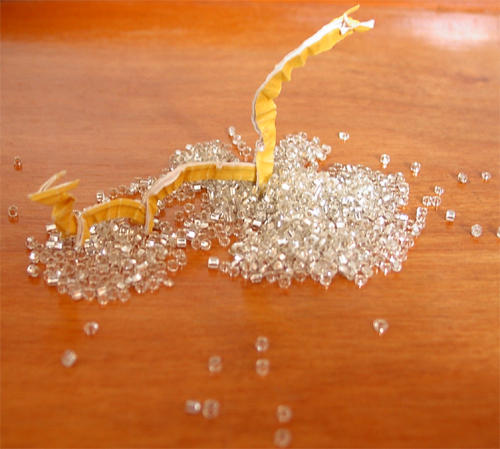
Also: While you *can* bake sculpey multiple times, and I did do Castiel in several layers, his head being first, I think I may want to keep in mind that baking it too much does change the colour. Castiel's skin-tone and the pendant were made from the same clay, but the pendant was only baked once, whereas Cas's head was baked at least three times.

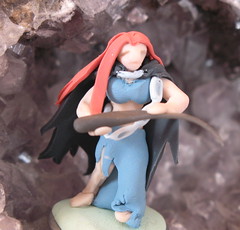
And to finish off a little photoshopped image of the classic Castiel pose:
castiel

Tuesday, May 5, 2009

WIP Report: DDR Bag

I'm trying out freezer paper stenciling on fabric for the first time, and decided to use bleach rather than paint because I thought it'd get a cool effect for the design I'm going for.


B4U by ~jtptan on deviantART

The black and orange are different object groups and I printed them seperately so the positioning will likely be different for the finished project. In my head, I want the arrows bleached almost white with the robot-guy bleached less so he's in the background.

So I went to try it out (doing the arrows layer first).

Conclusion: check that you're not using 'colour guard' bleach if you're trying to bleach out colour. 

So I'm going to have to borrow some bleach or buy a jug before I can continue.  As well as cut out a second sheet for the arrows stencil (easier than having to cut out that robot again o_o).

PS: If you're wondering what happened, if anything it's darker there now! I'm hoping that's because it's a bit damp though. If it's still like that tomorrow morning I'll give it a quick rinse to see if that will help >>
PPS: Maybe I should also find some better fabric if I have to go out anyway.

Not dead: Birthday Bento

Yeeeah, school kinda kept me busy for a while there, and then I spent a while recovering.  And class starts again Monday!  But I'm only doing two courses this summer so I should have time for crafting.

But! It was a good friend of mine's birthday last week and I got inspired by Bakerella to make some Cake Pops for her! We were out for supper for her birthday so the reasoning was we'd be too stuffed to actually eat a cake, and that they would be a bit easier to carry with us downtown, too.  You may or may not know that I'm notorious in my family for bad cooking - being what my mom calls "our own Elly May".  Well, these turned out fairly well, though it was a team effort between Bretta and me.  We should do more baking together - she loves baking and I love the crafty decoration bits, so between us we make a good team.

bento box

Erica likes sushi so that was how we themed them. We dipped them in chocolate, then the tops in white sprinkles for rice. We used some small candies to simulate the fillings.  In the box we mixed some coloured icing to stand in for wasabi and pickled ginger.

bento box 2

We meant to include chopsticks but forgot them at the last minute!  You can hardly tell in the party photo that she's holding two straws ^^

bento  box 3

There are instructions on how to make cake pops on Bakerella's blog. I really do recommend trying them, we were short on time that afternoon because it was the same night as my sister's prom, but we had a lot of fun.

I think if I was making a set of sushi cake pops again, or I guess cake bites since we didn't leave them on the sticks, that I would go about shaping them a bit differently.  I think you might get a better shape (for sushi) by after mixing the cake crumbs with the icing, rolling the 'dough' into logs the size of sushi logs and then chilling those, and then slicing them.  Of course, my experience is with clay so I'm not sure if that would turn out well, but I'd like to try it next time.

They seemed to go over fairly well.

Sunday, March 15, 2009

SoS #5: Squishy and a Polka-dot X-Wing

So... sorry I missed last week, and that I haven't posted any of those new projects yet, but school's been pretty busy lately.  So this week I decided to put up TWO projects!!


Squishy!
Squishy was my first crochet project EVER.  The only crocheting I'd done before him was the strap for a market-bag I made for a friend (the bag itself was knit and beaded).  Squishy generally lives sitting atop my computer monitor and actually has eight legs, though they were a bit hard to fit on.

Though I generally prefer knitting to crocheting - I still find crocheting quite awkward and slow - I have to say though, that stuff requiring shaping like small toys turn out really nice done in crochet.  I've done a few toys now and I like how they turned out :D

The only knitted toy I've done was a knitted ninja, and while I loved how it turned out, getting all the shaping done did get a little tricky, hehehe.


X-Wing
So this is an origami x-wing I folded.  It's another pattern from Joseph Wu's site, though the pattern itself is by Wayne Ko.

The pattern is actually a bit confusing in places - when I went to do it again(months later) I couldn't remember how I got it to work!  Nothing a bit of perseverance can't handle, however.

Sunday, March 1, 2009

SoS #4: Yoda Pumpkin

Photobucket

I carved this for Halloween a few years ago.  What you do is you take the picture you want to carve and make it layered in four (or so - it depends on the picture) tones of greyscale from white to black, print it out, and use it as your guide on the pumpkin.  I know some people use dremels but I personally found I had much more control with the exacto knife and box cutter combination I had going on.  If I remember correctly, I did punch through with a metal skewer to get some of the detailed edges on the super shiny bits.

I don't really have a lot to say about this hahaha.  I learned not to carve a pumpkin too far in advance of Halloween - the back was moldy by the time we put him out.

Coming soon:  I do have a (new) FO I'm fairly happy with to share, I just need to get some good pics.  I've also got a WIP, though I haven't decided whether I should wait until it's done to post.  I'll definitely take some WIP pictures of it in any case.

P.S.  Yoda is Bad Ass.

Sunday, February 22, 2009

Something old Sunday #3: 'Teeny' Origami Dragon


4"x0.5" yellow origami paper
Design by Joseph Wu. Modified because I made it so small, some bits are simplified.

I made this guy in 2005 - such a long time ago now!  I figured it was around about time I posted something non-sculpey on this site... and this was the first thing that came to mind that I knew where to find a picture of.

It is Very Small.


I have this thing where I tend to make things small.  With origami, after I figure out a pattern I always end up reducing it - or for simpler patterns making it small to start with.

Not this pattern - I've littered several desks of friends, family, and coworkers with bigger versions of this guy.  People got tired of little tiny cranes everywhere... these take longer and are a bit different from what you'd normally see to boot.

Now... this is proof that apparently I *used to* know how to take a picture, if you look at the nice one above, I apparently set the dragon up with some sparkly seed beads to act as the dragon's hoard.

Thursday, February 19, 2009

FOs: Meabh and Solkist

Meabh and Solkist

Two new finished objects to post today.  Well... actually they've been done for a little while but I only got around to taking pictures today.


Meabh
Meabh was my first mini that I built a skeleton for from a wire frame to build the clay onto.

Meabh
You can see all my finger prints and the dust and everything!  Okay, so stuff I didn't do in this one:  Hadn't started using the baking stuff more than once thing - and it could have used it.  A bunch of places I'd have made, and then mess up while I was working on other things.  The character is meant to be draped in a silver chain and carry the blade of a legendary sword.  You can see her legs especially are a bit messed up.  However, she is a step up, I feel, from the awkward postures of the goblins from my last post.  I was really proud at the time of the chain, and the cloak, especially the gathering at the hood.

Meabh
And here's the back of the cloak and her hair.  Very flat hair, I don't think I'll do hair that way again... it looks pretty much like what I did, which was cut it from a rolled out sheet of clay and stick it to her head.  I am pretty happy with her face though, especially in this side shot.


Solkist
Sol was made for a friend, whose request was 'an elf wizard with safety orange robes'.  He's made with a wire frame, and I did it him in two baking steps.  The orb on the end of his staff glows in the dark.

Solkist
The first step I made the head/ears and the torso (the white undershirt) onto the wire frame for the wizard.  This let me not worry about messing up his face/ears while I was making the rest of him, and already having a bit of bulk to build onto for the torso helped too, and held the wire frame together.

Solkist
I'm really happy with how his hair turned out, even if it would look completely ridiculous on a real person.  The bow is pretty nice.   Actually I'm pretty happy with how he turned out, period.  I did a lot better at not getting fingerprints all over him, too.


Lessons to carry on and ideas for future projects:
  • Doing the wire frame to build things on works pretty well, but it works even better done in multiple steps.
  • I've been having droopy/curving weapons a lot lately.  So I think in the future I'll either bake them separately, or support them with their own wire piece like Sol's staff.
  • I need to watch more carefully the sorts of impressions I'm leaving on the clay.  Could I do this on purpose, maybe get some fabric to press on the clay and give it a 'woven' texture?
  • Hair is not a flat sheet.  It doesn't look okay to make it like a piece of fabric.
  • Learn how to stage photos a bit better.
  • The better the picture in my head is starting out, the better the mini turns out.  Going to do more detailed sketches before starting minis in the future.

Monday, February 16, 2009

Something Old Sunday: The Legion of goblins.

Yeaah, I know, I know, but it's Sunday somewhere right?

It's... not?

Oh.  Well, I'm sure if we got the Tardis involved, it *could* be.

Got eaten by school.  It happens from time to time.  So, I didn't want to not post *anything* so I'm just going to put up a few pictures, and I'll come back and talk about them later.

So there are four goblins, two with swords, one with a dagger, and one with a shortbow/quiver.  I meant to add arrows later but never did.  They don't have names!  Hmm... I need a set of four names... all I can think of is Leo, Donnie, Raph, and Mikey.  But these goblins are not nearly cool enough for that.

Here they are, there are five individual shots because I took a behind shot of the archer to show the quiver:

Goblin Legion 01


Goblin Legion 02


Goblin Legion 03


Goblin Legion 04a


Goblin Legion 04b


And as a group:

Goblin Legion Group

Yeah I probably didn't need the flash on for that one.

You can see that these were made before I started using proper wire frames for things.  They've got an ogre buddy who's even the worse for wear, but he'll come in another post.  You can see I was having a bit of fun experimenting with different face types I could get made.  They're also not painted.  Nothing is!  Some day I am going to have a big painting day, but it has not come.

~Kerry

Sunday, February 8, 2009

Something Old Sunday #1: My first Sculpey Miniature

So, to start off, my MacBook's harddrive crashed. It's under warranty so they'll replace it and everything, but I'm currently waiting on it to respawn.

I thought instead of posting a whole slew of random pictures that I wouldn't have time to comment on properly all at once, I'd post only a few at a time. That also gives me time to find or take pictures of things...!

Alright, so today we have my very first miniature ever.
First set of miniatures.

Isn't he cute. I had even less of an idea of what I was doing than I do now, which is saying something, but he's still one of the ones I get the most compliments on if I show people a group of minis. He was relatively simple - I made a head and a cylinder (slightly squashed) for the body. Originally I had been thinking I would have him raising two arms above his head as if calling some force down from another plane. Honestly, after I made the first arm, I couldn't make a second one to match closely enough. So when I made the cloak I formed it to suggest a second (nonexistant) arm underneath.

I do like him, though. There's always the shady guy in the huge black cloak, and he does look pretty at home on the map.


Issues and lessons:

  • If you're going to have to make more than one of something, do them all at the same time in stages after carefully making sure you have the same amount of clay for each. Arms, legs, ears, anything.
  • The clasp on the guy's cloak is almost the same size as his head. I've decided it's some sort of creepy thing carved from bone, but really I just fumbled that one a bit. Oops. :(

What I should have learned but still messed up on in later projects:

  • "Eyeing it" doesn't work very well when you're working with such small sizes. I'm still not great at keeping my minis in appropriate scale to one another, but yesterday I made an unfortunate error in sizing within one miniature because I didn't compare what I was working on to the minature it was going to go with. Pictures will be included when I post that project.

Thursday, February 5, 2009

WIP: Beholder

Okay, so lately I've been playing around trying my hand at making miniatures for Dungeons and Dragons.  The scale is meant to be around 5 feet to 1 inch or so.  Not that I'm at a point where I'm very accurate about that.

Anyway, so here's my latest project so far:  The Beholder.  Anybody who's ever played d&d will have heard of this little many-eyed beastie.

Beholder

The base is a 2" washer (or a washer around about 2" in diameter anyway) to give you an idea for scale.  Done in Sculpey clay and "floating" on some heavier gauge beading wire.  I had this realization that I could bake sculpey more than once (though you only get to mold it before the first time you bake it) so I can make part of something, bake it to let it keep its shape, then add more clay and sculpt that, and bake it all again.  This is my first experiment with that - I made the green eyes first, just rolled the clay into balls and baked them.  Then, when I was making the  body of the monster I was able to set in the eyes without worrying about deforming them.

So, the sculpting part of the miniature is done, except I'm thinking now I might add some clay to the base and bake it again, just to pretty it up a bit.

How do I feel about how well it's turning out?
  • the baking the clay more than once thing is pretty awesome, I've already got a few ideas for things to do with that for future minis!
  • I think if I could do this again I'd use a wire base for the tentacles.  They turned out fine, but they did droop a bit while baking, and one pulled away from the body a tad too much for me to be happy with.
  • He turned out awfully cheery-looking.  I guess he's pretty exited to eat some PCs.
What's left?
  • painting on some pupils
  • adding something over the washer for a nicer base


I am working on a few other things right now but I want to wait until I have some good pictures to talk about them.  Also, I think I'll start getting up some old projects this weekend.

Wednesday, February 4, 2009

Geekcraft's First Post!

I don't really know exactly how to start. I suppose I'll just talk a little about what I want this blog to be, and myself.

I am a crafter. A chronic crafter. And I'm also a geek. Quite often, these two dominant qualities of mine intersect. After all, what's more fun than indulging TWO of your favorite things at once? So this blog will be things I make - pictures and explanations. I guess if anybody's interested I'll consider doing a few tutorials.

I also plan on posting links to things *other people* have made, that I think are cool. Or things that inspire me. Or just really interesting geeky things.

Wow, that sort of tapered out, eh?

Um. I'm Canadian. I'm almost done my business degree, after which I hope to find gainful employment, so I have more time to make crafts, and more money to supply my craft stash.

Geeky things I'm into and you'll probably see referenced? Well, a lot, but here's some of the main ones: Lord of the Rings, Harry Potter, Dungeons and Dragons, Avatar the Last Airbender, Disney, videogames (would it really surprise you if I mentioned a company called Blizzard?), Star Wars, Star Trek, The Sword of Truth books, english literature, many more fantasy and science fiction series.

What sorts of crafts? Again, I'm into a lot of different things. Sort of like, broad but not deep, I'm intensely curious and I love to learn about new things, so as a result I've either tried or plan to try almost everything, but I wouldn't call myself expert at anything. Lately however I've mostly been doing knitting, crocheting, and sculpting with polymer clay.

Well, I hope that's been even moderately helpful.

~Kerry aka jtptan